CortexHive CortexHive your second brain, working as a hive

Welcome to the colony.
Here's how to run it well.

CortexHive is a hive of AI agents that share memory and do real work: they chat with you, write documents, track tasks in Cortex OS, and run multi-step workflows. This guide follows the order you'll actually click through, first run to daily driver, with a real screenshot of every screen that matters.

Prefer to watch? Full system tour (13 min). Start in 1080p, or choose a lower quality if your connection needs it.

QUALITY
See what's inside below, or jump straight to a section ↓

The whole product at a glance

Four surfaces, one hive

Everything you touch reads from the same live workspace. Here is the map before the walkthrough: where you work, how a request moves through your team, and what makes it different.

Mission Control briefing
01Mission Control
Your command center: the daily briefing, the Stinger voice and chat orb, live analytics, and automations.
The Hive roster
02The Hive
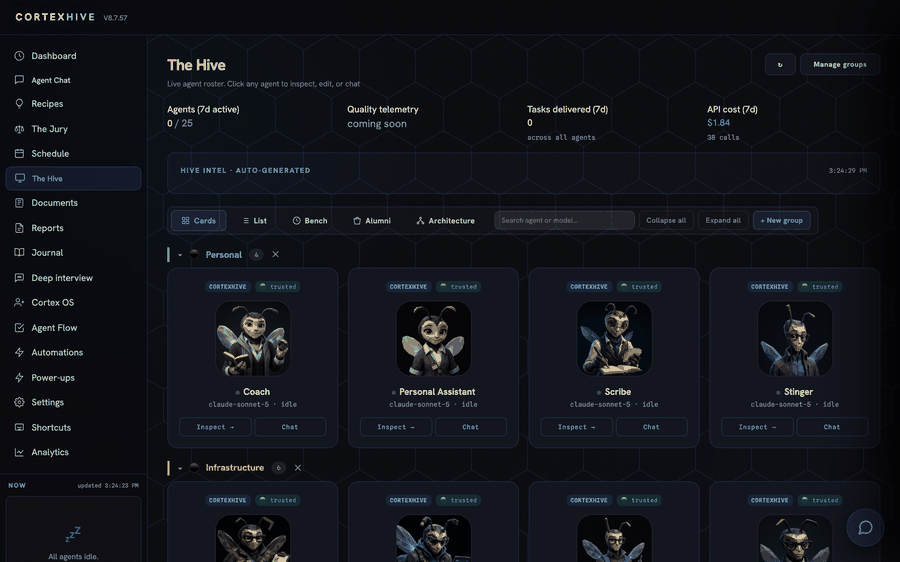
Your org chart of agents. Inspect any one, chat with it, or personalize it to your business without breaking its core.
Cortex OS tasks board
03Cortex OS
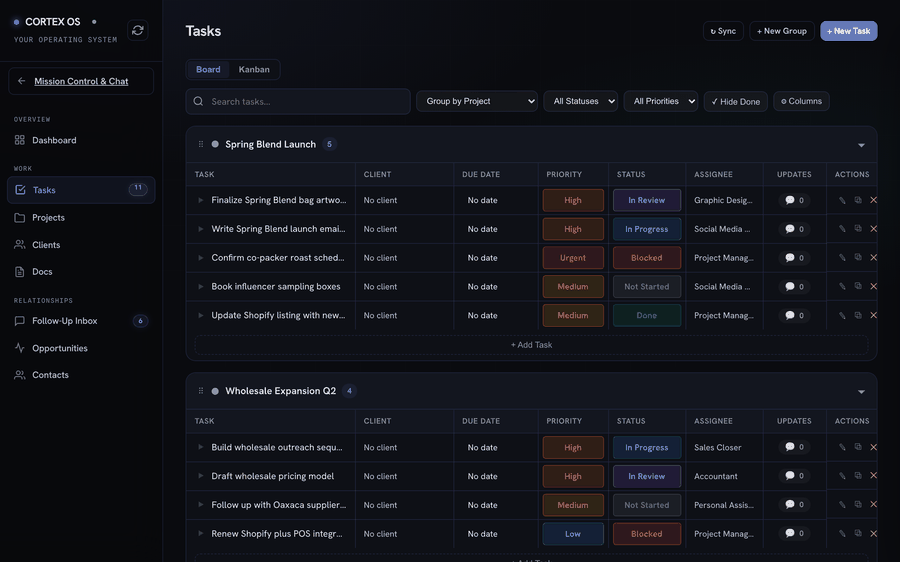
Where the work is tracked so nothing is lost: tasks, projects, deals, contacts, and leads.
Agent Chat
04Agent Chat
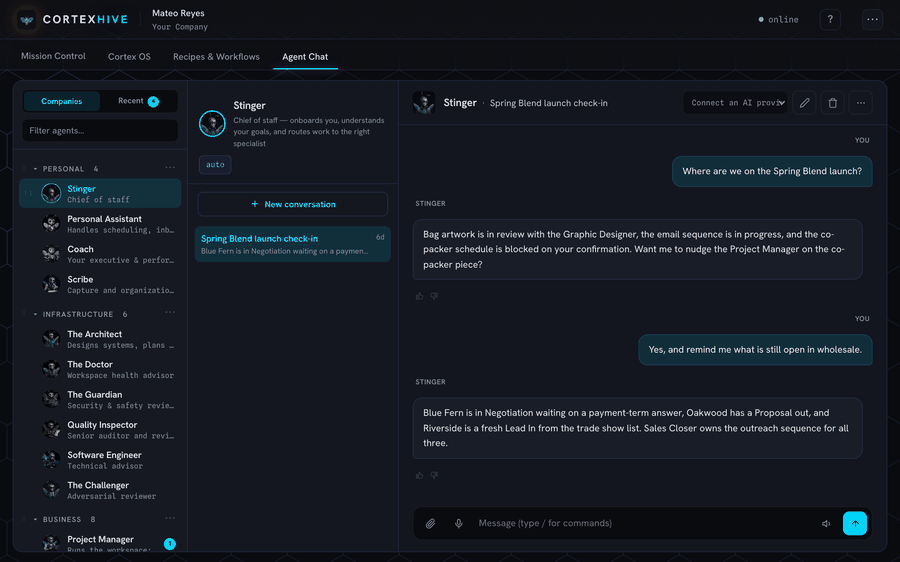
Talk to one agent or the whole team. Watch them coordinate live, or send it to the background and check the outcome.

How a request flows through your hive

01
You askBy chat or by voice, in plain language.
02
Stinger routes itYour chief of staff picks the right specialist.
03
The specialist worksWith your context, your second brain, and its tools and connected apps.
04
It gets trackedLanded in Cortex OS so it can never be lost.
05
You reviewSee what moved, what is blocked, what needs you.

What makes it different

01
Model-agnosticRuns on any AI, even a free one. Every new model is an upgrade, not a threat.
02
The second brainIt remembers and connects your whole business. The longer you use it, the more it is worth.
03
A team, not an internNamed specialists with a project manager watching for drift, not one general assistant.
04
Yours to shapePersonalize any agent; product updates improve it without erasing your changes.

What's in this guide

1 Your first 5 minutes

Four things happen once, the first time you ever open CortexHive. In order:

  1. Create your account. On the sign-in screen, tap "No account yet? Create one →". Enter your invite code, your email, and a password (10+ characters), then tap Create Account.
  2. Read and sign the beta agreement. One screen, five short clauses: confidentiality, beta status, "you're talking to AI, verify anything important," what data is stored, and governing law. Scroll to the end, check the box, then type your full name: that's your signature, recorded with your email, IP address, and a timestamp. It appears once per account.
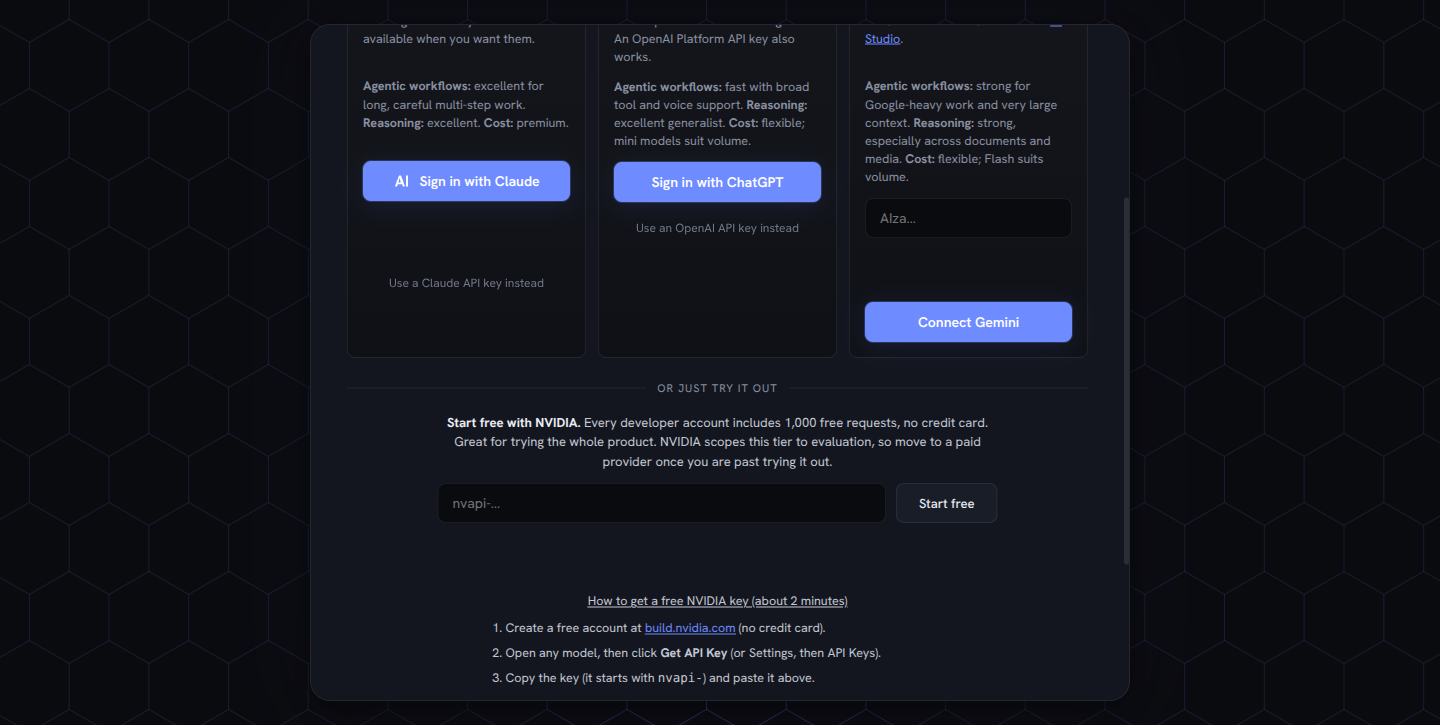
  3. Connect one AI provider. Claude, ChatGPT / OpenAI, or Gemini, whichever you already use (DeepSeek, Moonshot / Kimi, and xAI can be added any time in Settings). Sign in with Claude and Sign in with ChatGPT are one click; OpenAI and Gemini also connect with an API key. You can't skip this step: CortexHive runs on your account, not ours, so nothing works until one is connected. Don't want to use a paid account yet? Skip ahead to Costs & control for the free NVIDIA path, no credit card required.
  4. Meet Stinger. Your chief of staff opens the conversation, asks a few questions about you and your goals, and gets your starter team (25 specialists plus Stinger) moving.
The Connect your AI screen: Claude, ChatGPT/OpenAI, and Gemini as three equal provider cards each with a Sign in button, plus a Start free with NVIDIA panel below with an API key field and a How to get a free NVIDIA key step-by-step panel.

The Connect your AI gate: Claude's "Sign in with Claude" needs no key; OpenAI and Gemini connect with a pasted API key. NVIDIA's free tier is right below, no credit card.

app.cortexhive.ai CortexHive Beta Access Agreement 5 short clauses, then you're in. 1 Confidentiality · 2 Beta status · 3 You're talking to AI 4 Your data · 5 Governing law I have read and agree to the above. Type your full name to sign… I Agree and Continue to CortexHive 2 Your signature: name only

The beta agreement: scroll to the end, check the box, type your full legal name, then Agree.

Pro tip: pick the provider you already pay for. CortexHive never marks up your usage, so there's no wrong choice, only a familiar one. On phone or tablet, add CortexHive to your home screen (browser Share → Add to Home Screen) so it opens full-screen like a real app.

2 Set up for best results

The single biggest lever for good output is context. Give the hive real information before you ask it to work.

  1. Tell Stinger about yourself. Right after connecting, answer Stinger's setup questions (by chat or a quick form) about your business, your goals, and how you like things done. This shapes your starter team and your first tasks, and feeds the Activation Journey in the next section.
  2. Import your documents. Open Documents in the left sidebar and drag files straight onto the page: up to 20 at once, .txt, .md, or .pdf. The hive reads what you give it before it answers, instead of guessing. See a real, populated Documents view in Section 5, The Second Brain.
  3. Connect 2-3 Power-ups you actually use. Mission Control → Power-ups can wire 500+ tools (Gmail, Google Calendar, Slack, Notion, and more): 34 live today, and more every day. Two or three real ones beat ten you'll never touch.
Pro tip: documents plus Power-ups is the difference between a generic assistant and one that already knows your client list, your brand voice, and your calendar.

3 The Activation Journey

Flagship · not a chatbot, a workforce with a mission

Right after your first quick start, Stinger nudges you toward one thing: a real conversation that turns into a real plan. This is what makes CortexHive different from a chat window: it ends in agents doing specific work, owned by name.

Part 1: the deep interview

Stinger asks about you across seven chapters: personal goals, work, health, coaching, things to learn, preferences, and short and long-term goals. Open it from the Deep interview item in the sidebar, or the "Deep interview" quick action, any time.

  1. Answer one chapter at a time. Type or use the mic; each chapter saves the moment you move on.
  2. Stop and come back whenever. The interview is resumable: reopen it later and it lands you back on the first unanswered chapter, not the start.
  3. Review or edit any answer. "Review all answers" shows everything you've told Stinger in one place, each one editable.
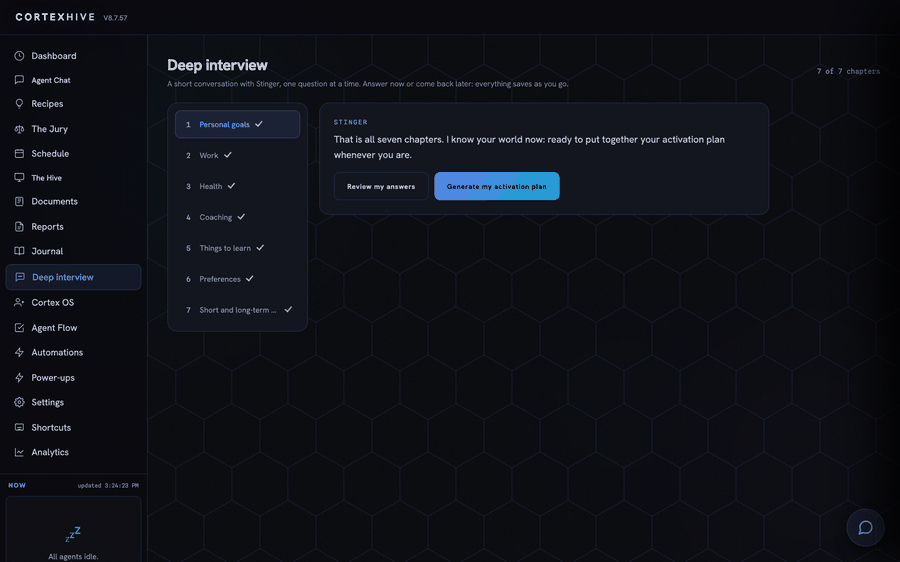
The Deep interview view: a seven-chapter progress rail (Personal goals, Work, Health, Coaching, Things to learn, Preferences, Short and long-term goals) all checked off, with Stinger offering to review answers or generate the activation plan.

Deep interview: seven chapters, one conversation at a time, saved and resumable.

Part 2: the activation plan

Once the interview is done, Stinger runs your answers, your north star, and the real roster of agents in your account through the flagship model to write your Activation Plan: a chief-of-staff briefing, not a chat reply.

Summary and quick win

A plan framed in your own words, plus the one thing worth doing in the next ten minutes.

First moves, each owned

Three to six concrete moves, each tagged automation, task, setup, or deliverable, each with a named agent as the owner.

Friction points

The real obstacles Stinger noticed in your answers, named plainly.

Grounded in your world

No generic advice: every move references your actual roster and what you told Stinger.
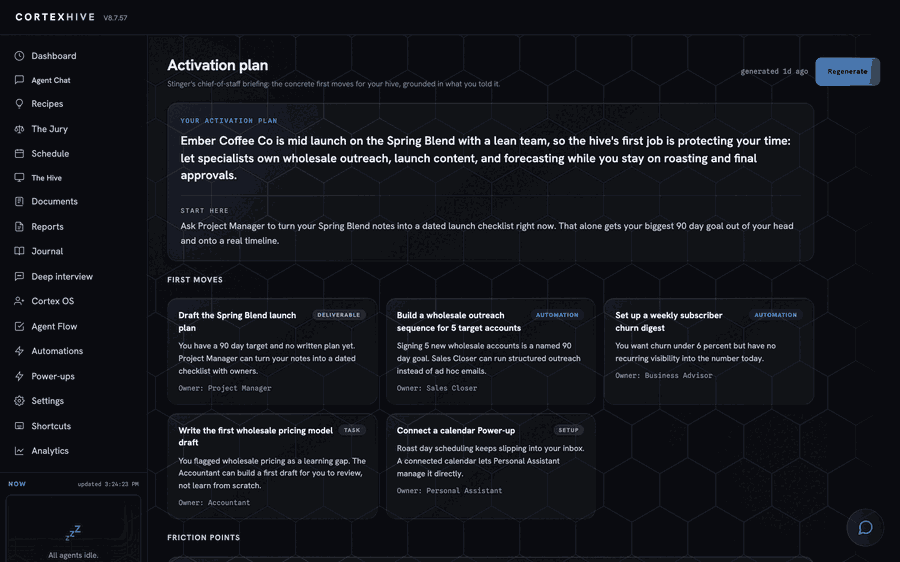
The Activation Plan view: a summary framed in the user's own words, a Start Here quick win, and a First Moves grid of cards each with a title, a why, an owning agent, and a kind tag such as Deliverable, Automation, Task, or Setup.

A real activation plan: first moves owned by name, not a list of generic suggestions.

Part 3: your north star

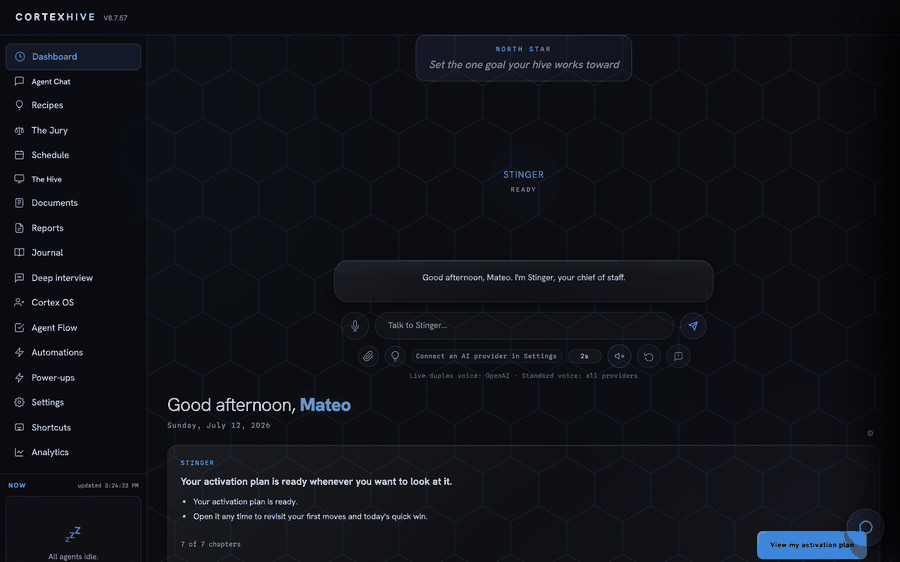
Mission Control's briefing carries one more piece: a banner where you set the single goal the whole hive works toward. It shows once, as a prompt, until you set it, then it steps aside for good, you can always change it again from the briefing. You can see it in its opening prompt state at the top of the Daily driving screenshot next.

Why it matters: this is the difference between "an AI you chat with" and "a workforce with a mission." The interview isn't a form, the plan isn't a summary, and the north star isn't a slogan: together they tell every agent in the hive what to actually do for you, and why.

4 Daily driving

Two habits cover most days: check Mission Control, then talk or type. Go deeper in Agent Chat when a conversation deserves its own thread.

  1. Open Mission Control. Dashboard gives you a briefing: what the hive did, what needs your attention, over the honeycomb background that marks every Mission Control screen. It's cached for 3 minutes, so glancing at it twice in a row doesn't burn a fresh AI call.
  2. Talk or type to Stinger. The composer takes plain text, or tap the mic. OpenAI accounts get live duplex voice (talk and get answered in real time); every provider gets standard voice (say something, hear a spoken reply). Typing always works.
  3. Let Stinger act, hands free. This isn't voice-to-text into a chat box: Stinger can search the second brain, write documents, and create or assign Cortex OS tasks to any agent by name, by voice. It confirms out loud what it did in one short sentence, and asks first before anything irreversible.
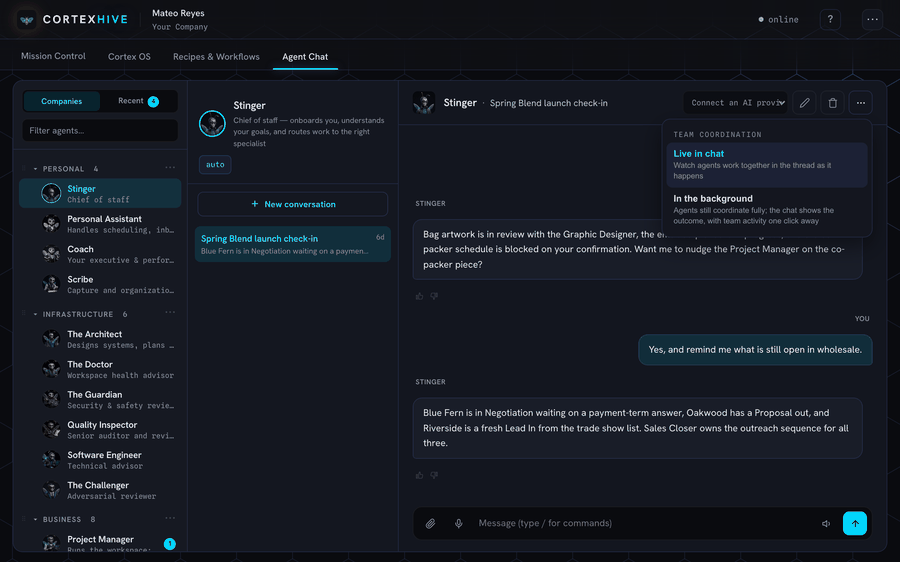
  4. Open the full Agent Chat app for durable threads. Click Agent Chat in the sidebar (or go straight to https://app.cortexhive.ai/chat): pick any agent on the left, start a named conversation, and it's saved so you can pick the thread back up later, on any device. Each conversation has its own model picker in the header, so a quick question and a heavyweight plan can run on different tiers.
  5. Choose how a conversation coordinates the team. Open the three-dot menu next to rename and delete in a conversation's header and pick Live in chat to watch agents hand work to each other as it happens, or In the background to keep the thread quiet and collapse the coordination into a "Team activity" row you can expand any time. Either way the work happens the same; this only changes what you watch.
Mission Control's Dashboard view over the honeycomb background: the north star banner prompting the user to set their one goal, the Stinger orb reading ready, a personalized greeting, and the composer row with a mic button and a Talk to Stinger text field.

Mission Control's Dashboard: the north star banner up top, Stinger's orb and greeting below, the composer at the bottom.

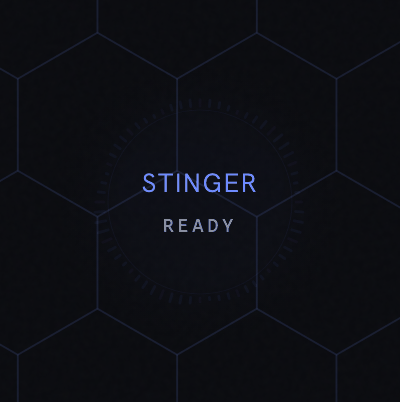
A close-up of the Stinger voice orb on Mission Control, over the honeycomb background, reading STINGER and READY.

The voice chief of staff: the same orb listens, thinks, and speaks, and now executes and delegates instead of only replying.

The Agent Chat app: the agent roster grouped by team down the left rail, a durable named conversation with Stinger in the middle column, and the real thread open on the right with the per-conversation model picker in the header.

Agent Chat: a durable, one-on-one thread per agent, saved so you can pick it back up on any device.

Agent Chat with a real conversation open: the three-dot conversation options menu expanded next to rename and delete, showing Live in chat and In the background as the two team coordination modes, with the per-conversation model picker visible in the header.

The team coordination menu, next to rename and delete: Live in chat vs. In the background, with the per-conversation model picker beside it.

Pro tip: Stinger only introduces itself once. After that it remembers your open threads and picks up where you left off, so you don't have to re-explain yourself each session.

5 The Second Brain

Every agent in the hive can reach into one shared memory: your documents, your Cortex OS tasks, your deep interview answers, and your goals, ranked and connected, in English or Spanish.

This isn't a separate screen, it's a capability every agent carries (the tool is called search_workspace). Ask any agent a question like "what do we know about the wholesale pricing model" or "what did we decide about the Spring Blend launch", and the answer comes back grounded in your real workspace, with the connected notes it pulled from named, not invented.

  1. Write documents that reference each other. Link one document to another with double brackets, [[Like This]], Obsidian-style. No special syntax to learn beyond the double brackets.
  2. Ask, don't search. Instead of hunting through folders, ask an agent directly: it ranks across documents, tasks, interview knowledge, and goals, and follows the links between them.
  3. Trust the connections are real. A document that links three other documents shows up as a small, real web, the same shape as an Obsidian graph, built from what you actually wrote.
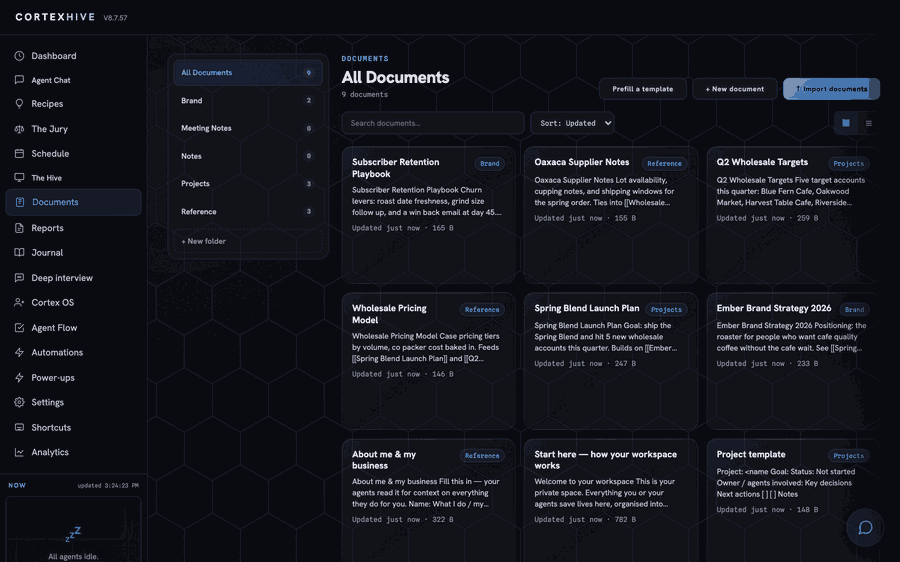
The Documents view: All Documents with a folder rail (Brand, Meeting Notes, Notes, Projects, Reference), a search bar, and a grid of real document cards whose preview text shows double-bracket wikilinks to other documents.

Documents, the second brain's raw material: each card's preview shows real [[wikilinks]] to the documents it connects to.

Pro tip: the second brain is bilingual by design. Write a document in Spanish and link it from an English one (or the other way around); an agent asked about it in either language finds it.

6 The Jury

Before you ship a plan, a post, or a pitch, get an honest read from a simulated audience instead of guessing.

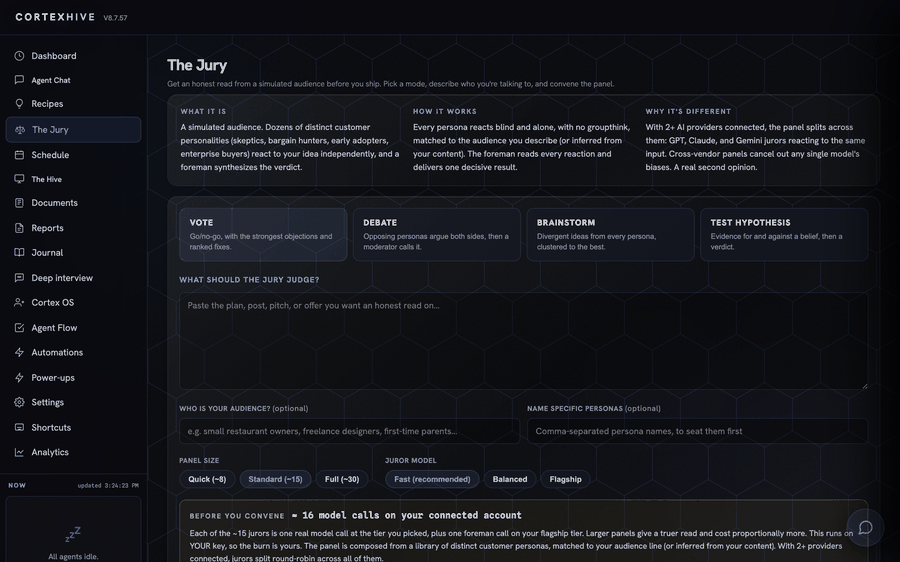
The Jury seats dozens of distinct customer personas (skeptics, bargain hunters, early adopters, enterprise buyers) who react to your idea independently, with no groupthink. A foreman reads every reaction and delivers one decisive verdict. Connect two or more AI providers and the panel spreads round-robin across them, GPT, Claude, and Gemini jurors reacting to the same input, so the result is not just one model's opinion of itself.

Vote

Go or no-go, with the strongest objections and ranked fixes.

Debate

Opposing personas argue both sides, then a moderator calls it.

Brainstorm

Divergent ideas from every persona, clustered to the best.

Test hypothesis

Evidence for and against a belief, then a verdict.

  1. Pick a mode. Vote, Debate, Brainstorm, or Test Hypothesis: each changes the prompt and the shape of the answer you get back.
  2. Paste what you want judged. A plan, a post, a pitch, an offer, or a hypothesis. Optionally name your audience, or specific personas to seat first.
  3. Choose panel size and juror model. Panel size is Quick (about 8 jurors), Standard (about 15), or Full (about 30). Juror model is Fast (recommended), Balanced, or Flagship.
  4. Read the cost preview before you convene. The "Before you convene" panel shows the real call math, roughly one model call per juror plus one foreman call, on your connected account.
The Jury view: four mode buttons, Vote, Debate, Brainstorm, and Test Hypothesis, the What it is / How it works / Why it's different explainer above them, and the composer with panel size and juror model controls, plus a cost preview before convening.

The Jury: four modes, a plain-language explainer, and a cost preview before anything runs on your account.

Pro tip: a panel is only as honest as what you feed it. Give real specifics (the actual price, the actual offer) instead of a vague summary: a jury of skeptics catches a vague pitch immediately.

7 The Hive

You start with 25 specialists plus Stinger as chief of staff: 26 agents, day one.

Stinger

Chief of staff. Onboards you, tracks what's in flight, and routes each request to the right specialist.

Specialists

Named roles like Accountant, Content Producer, Sales Closer, Scribe, Personal Assistant, and more, each scoped to one job.

The Challenger

Adversarial reviewer. Argues the strongest case against a plan, and names the assumptions that have to hold, before you commit.

  1. Browse the roster. Mission Control → The Hive shows every agent and what it's scoped to do, in Cards, List, Bench, Alumni, or a full Architecture graph view.
  2. Ask directly, or let Stinger route. Talk to a specialist by name, or describe the task to Stinger and let it hand off.
  3. Use The Challenger before a real decision. Give it a plan, a draft, or a number, and it argues against it hard, then tells you plainly if the plan actually holds up.
  4. Need a role that doesn't exist yet? Tell Stinger. It hands the request to The Architect, which designs and builds the new specialist from a plain-language description, no code, no special screen.
The Hive roster: agent cards grouped by division (Personal, Infrastructure, Business, Creative and Growth), each showing the agent's bee-mascot avatar, name, model, and trust status.

The Hive: every agent, grouped by division. Click a card to chat, inspect, or reassign it.

Pro tip: give The Challenger something concrete, a plan, not a vague idea. It reviews and argues; it doesn't execute the plan or write the final deliverable itself.

Make an agent yours

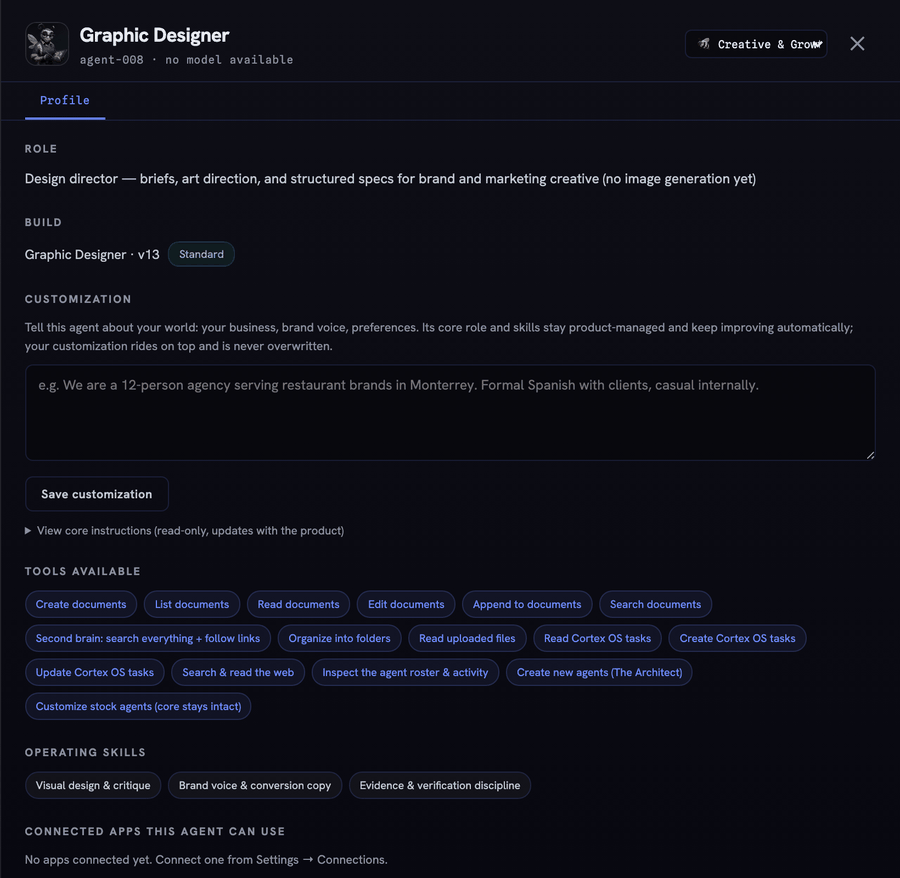
Every stock agent is built in two layers: a core (its role, skills, and operating rules) that is product-managed and keeps improving on its own, and a customization layer that is entirely yours. The core never changes because you wrote something; your customization rides on top of it and is never overwritten.

  1. Open an agent's profile. Click Inspect on any agent card to open its drawer, on the Profile tab by default.
  2. Tell it about your world. In the Customization box, describe your business, your brand voice, and how you like things done, plain language, no special syntax.
  3. Save it. Click Save customization. From then on this agent applies your notes on top of its core role, every time.
An agent's Inspect drawer, Profile tab: Role, Build (archetype name, version, and a Standard or Customized badge), the Customization text box with a Save customization button, Tools available, and Operating skills.

The Customization editor: your notes about your business layer on top of the agent's managed core, and nothing you write is ever lost on an update.

8 Cortex OS

Cortex OS is where the hive's real work lives: tasks, projects, deals, and the people behind them, all in one operating system your agents read and write directly.

Tasks and Projects

A board grouped by project, status pills from Not Started through Blocked to Done, with priority, assignee, and due date per row.

Clients and Contacts

The people and companies on the other side of the work, linked to the tasks and deals that reference them.

Opportunities and the Follow-Up Inbox

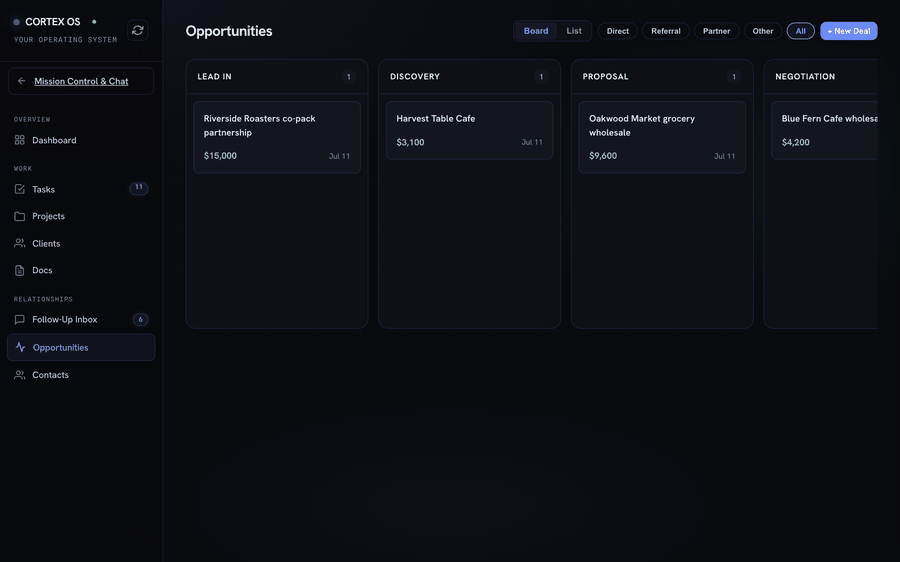
A deal pipeline from Lead In to Closed Won or Closed Lost, plus an inbox for inbound leads waiting on a reply.

  1. Open Cortex OS. Click Cortex OS in the Mission Control sidebar, or go straight to https://app.cortexhive.ai/crm.
  2. Work the Tasks board. Group by project, filter by status or priority, and every task an agent creates or completes shows up here in real time, the same list Stinger reads when you ask "what's on my plate today."
  3. Track deals in Opportunities. A Kanban pipeline by stage, Lead In through Discovery, Proposal, Negotiation, to Closed Won or Closed Lost, each card carrying its value.
  4. Let agents update it for you. Any agent can create, read, and update Cortex OS tasks as a tool, and can be delegated a task by name straight from voice or chat, see Daily driving.
Cortex OS Tasks board grouped by project, showing rows with client, due date, priority, status pills (In Review, In Progress, Blocked, Not Started, Done), and assignee for each task.

Cortex OS Tasks: grouped by project, every status from Not Started to Done, assignee and priority on every row.

Cortex OS Opportunities view: a Kanban board with columns for Lead In, Discovery, Proposal, and Negotiation, each column holding a real deal card with a company name, dollar value, and date.

Cortex OS Opportunities: the deal pipeline, stage by stage, with real dollar values on every card.

Pro tip: Cortex OS is not a mirror of Agent Flow. Agent Flow is the hive's own execution chatter; Cortex OS is the durable record of work and relationships, the one your agents (and your team, if you invite one) actually act on.

9 Getting real work out

Recipes, workflows, and automations are the same idea at three levels of commitment.

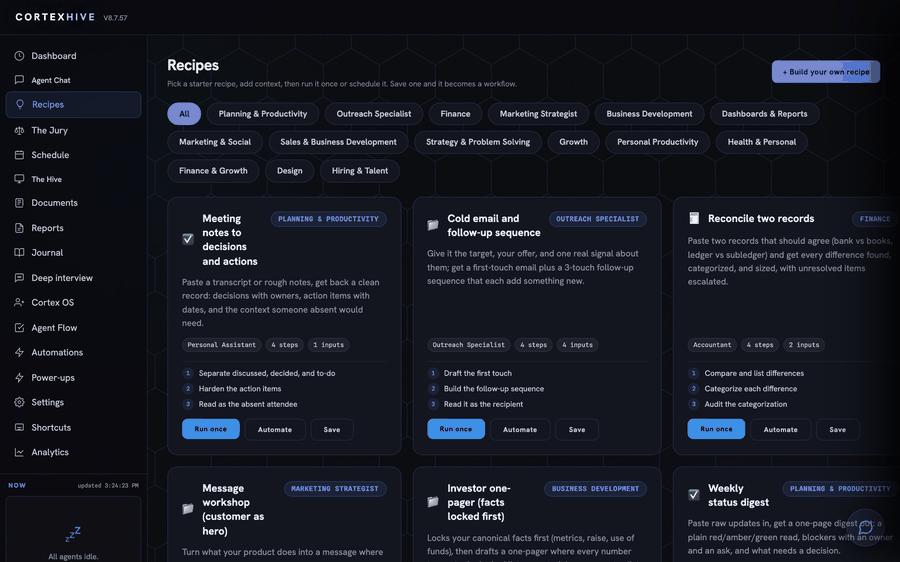
  1. Start from a Recipe. The Recipes tab has ready-made templates grouped by category, planning, outreach, finance, marketing, and more. Run one once to see what it produces.
  2. Save what works. Turn a recipe, or anything you build yourself, into a named, repeatable workflow with Save.
  3. Automate the ones you'd run every week anyway. A saved workflow becomes an automation on a schedule or a trigger (needs a connected Power-up).
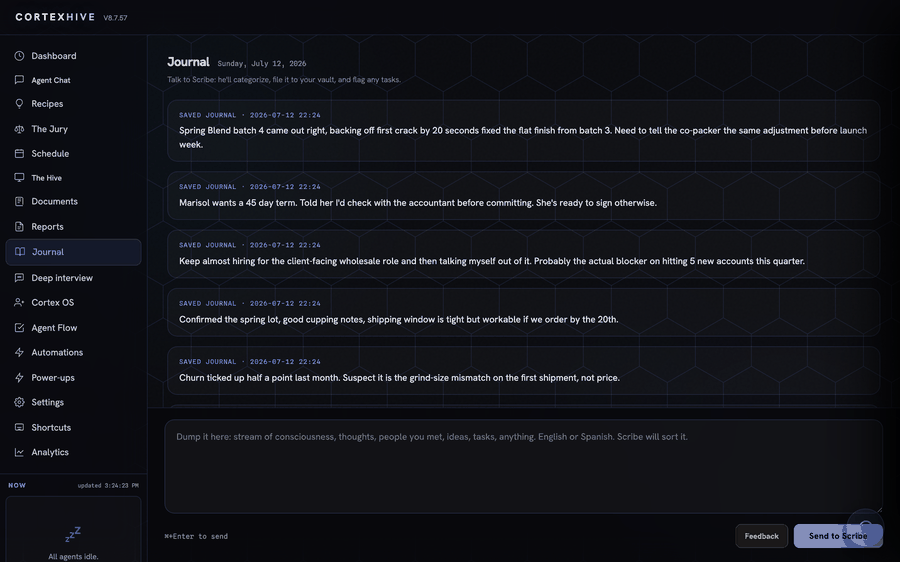
  4. Keep a running journal. Journal is a stream-of-consciousness dump to Scribe: type or talk, in English or Spanish, and Scribe files it, tags it, and flags anything that should become a task.
  5. Find the output. Anything written lands in Documents. Reports gives you a live rollup of hive activity (tasks, workflow runs, automations), no writing required.
The Recipes view: a row of category filters, and a grid of starter recipe cards, each showing its owning agent, step count, input count, a numbered step list, and Run once, Automate, and Save buttons.

Recipes: run once to see the output, Save to keep it as a workflow, Automate to put it on a schedule.

The Journal view: a running list of saved journal entries with timestamps, each a short real note, above a composer prompting the user to dump stream-of-consciousness thoughts in English or Spanish for Scribe to sort.

Journal: dump it here, Scribe sorts it, files it, and flags anything that should become a task.

Pro tip: run a recipe once before you automate it. A dry run catches the wording you'll want fixed before it starts repeating on its own.

Build a custom dashboard

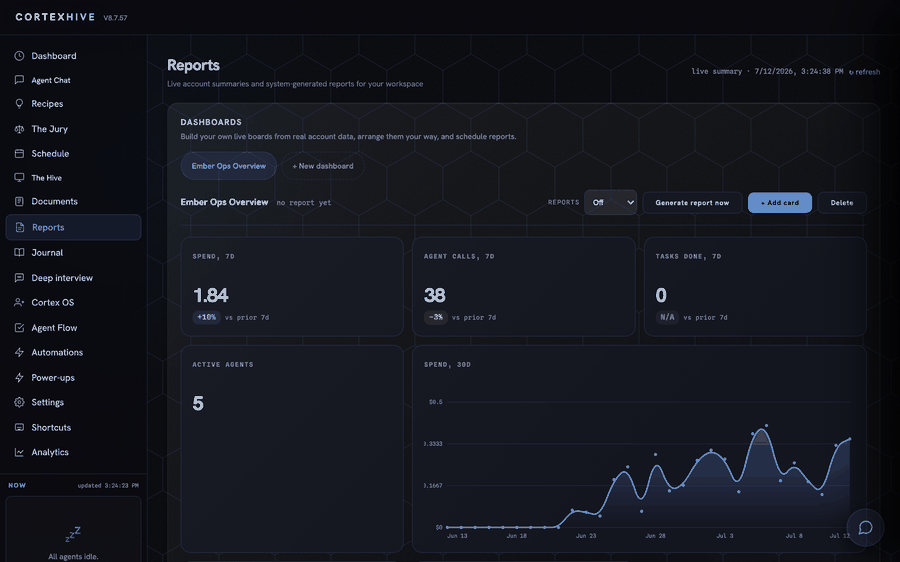
Reports → Dashboards lets you build your own live boards, Shopify-style, from your account's real data: a number, a trend line, a leaderboard, a table, a heatmap, or a status split. Arrange them your way, then turn them into a report on a schedule.

  1. Create a dashboard. Reports → Dashboards → + New dashboard, give it a name.
  2. Add cards. + Add card, pick a type and a real data source (spend, tasks done, calls per day, top agents, open tasks, and more), set its width, and it appears on the board immediately with live numbers.
  3. Arrange it your way. Drag a card's grip handle to reorder, or use its menu to resize.
  4. Turn on automated reports. Set the Reports dropdown to Daily or Weekly, or click Generate report now for an on-demand one, saved straight to Documents.
Reports view showing the Dashboards builder: a dashboard tab strip, Generate report now and plus Add card controls, and a card grid with real stat tiles (spend, agent calls, tasks done, active agents) and a spend-over-30-days line chart, all built from real account data.

Reports → Dashboards: your own boards, built from live account data, with scheduled reports on top.

10 Costs & control

You're always spending your own AI account, never ours. Here's how to see it, steer it, or try CortexHive for nothing first.

  1. BYOK, bring your own key. CortexHive runs on the Claude, OpenAI, Gemini, or other account you connect. What you spend goes straight to that provider, at their price, with no markup.
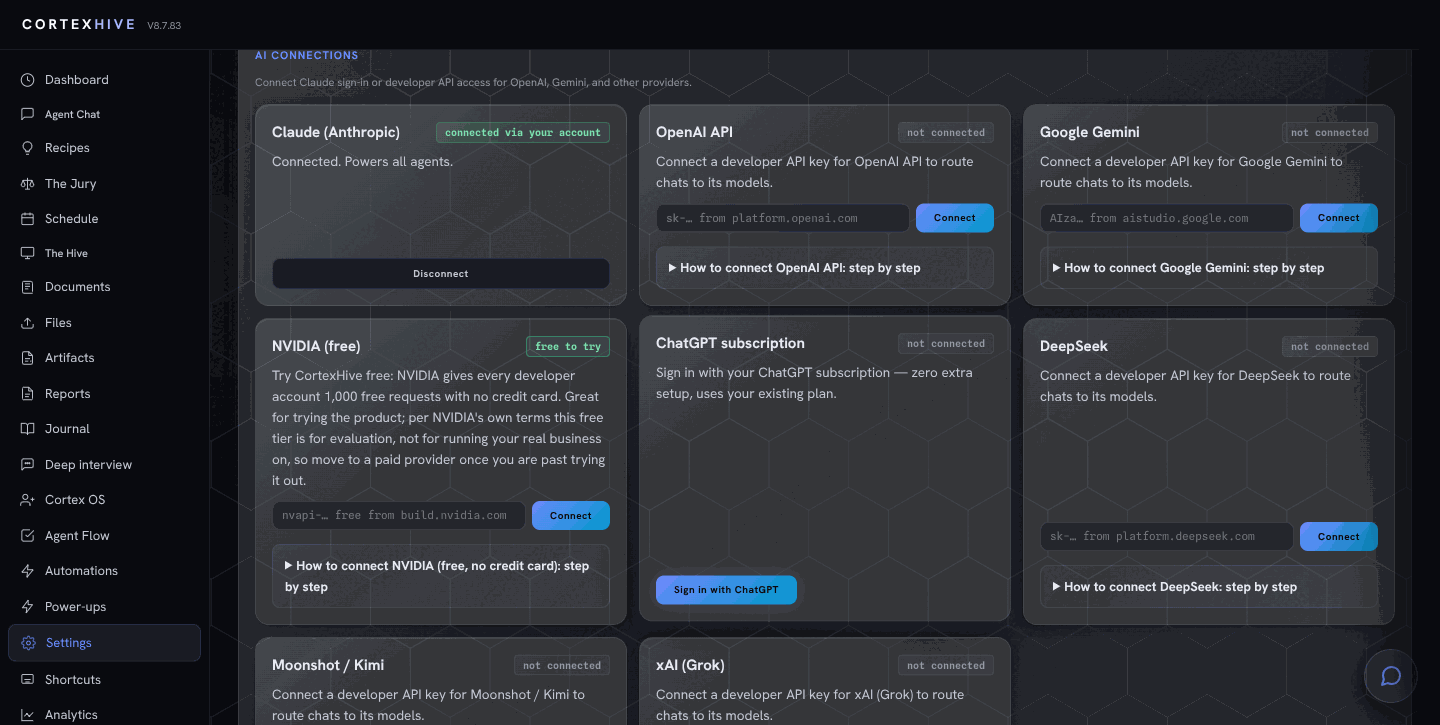
  2. No card yet? Start on NVIDIA's free tier. Settings → AI Connections lists NVIDIA alongside Claude, OpenAI, and Gemini: every developer account starts with an allowance of free API credits, no credit card needed, enough to try the whole product. NVIDIA's own terms scope this tier to evaluation, not running your real business on it, so move to a paid provider once you're past trying it out.

    Watch: generating your free NVIDIA key (about 2 minutes)

  3. More providers, if you use them. DeepSeek, Moonshot/Kimi, and xAI (Grok) connect the same way, each with a step-by-step "how to connect" panel, and a short setup video for the providers that have one.
  4. Route models on purpose. Pick a model per agent, or per conversation (see the model picker in Agent Chat), when it matters: heavier reasoning for a real plan, a lighter model for volume work.
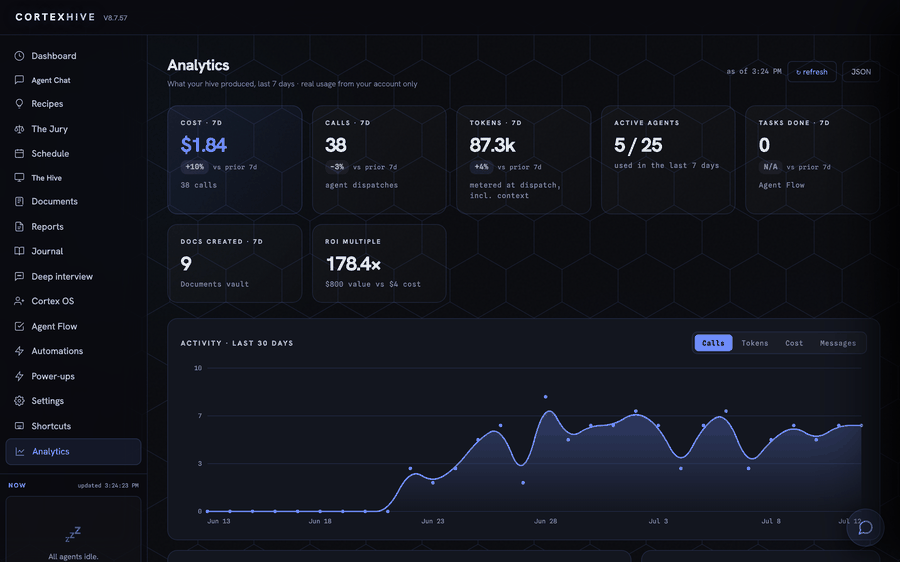
  5. Check Analytics. The Analytics tab breaks down calls, tokens, and cost, with a 30-day activity chart and an ROI multiple: real numbers, not estimates.
  • Video is a separate, optional connection. Settings → Media generation takes a Higgsfield API key and turns on video: your agents can animate a picture into a short clip and it lands in your workspace as a download. It is not an AI account and does not power chat, so it does not replace one of the providers above. Generation runs on your own Higgsfield plan and spends your own Higgsfield credits, CortexHive does not resell them, and every render asks you to approve it first. Content you generate through a connected Higgsfield account is handled under Higgsfield's own terms, including their use of inputs and outputs to train their models. CortexHive never sells your data and never trains on it.
  • Settings AI Connections: eight provider cards, Claude, OpenAI, Gemini, NVIDIA marked free to try, DeepSeek, Moonshot slash Kimi, and xAI, each with a connect field and a How to connect step-by-step panel.

    Settings → AI Connections: every provider CortexHive supports, including NVIDIA's free, no-card tier.

    The Analytics view: stat tiles for Cost, Calls, Tokens, Active Agents, Docs Created, and ROI Multiple, each over the last 7 days, above a 30-day Activity chart with real usage plotted across Calls, Tokens, Cost, and Messages tabs.

    Analytics: cost, calls, tokens, and ROI, refreshed from your account's real usage.

    Your data: private to your account, isolated from every other workspace, and exportable anytime via Download my data in Settings. Your API key is stored encrypted and never shown again in plain text.

    11 Troubleshooting, quick hits

    Most hiccups are self-explanatory once you know what they mean.

    Look up anything: Shortcuts & Capabilities

    Shortcuts & Capabilities in the sidebar is a live reference, not a tour: every keyboard shortcut, plus exactly what each agent can do and how to trigger it, from talking to Stinger to connecting a Power-up. Skim it once and you'll stop wondering whether CortexHive can do something.

    Quick picks: ⌘K / Ctrl+K command bar, Esc close or cancel, Enter to send and Shift+Enter for a new line, ⌘S / Ctrl+S to save a document or your Hive layout.

    Full answer library: Mission Control → SettingsHelp & FAQ has the complete, current Q&A set, and it's kept in sync with the product. Check there first before asking a human.
    Do I need to install anything?
    No. CortexHive runs in your browser. Optionally "Add to Home Screen" so it opens like an app.
    Does it cost money beyond my provider bill?
    No. CortexHive runs on your own connected account, including a free NVIDIA tier with no credit card, and never marks up your usage.
    Can teammates use it with me?
    Yes. Each teammate signs in with their own email and sees the shared Cortex OS, tasks, and agent roster.
    Can my agents actually make things, or just chat?
    They make things. Ask an agent to write a document and it's saved to Documents, editable, searchable, foldered, and linked into the second brain. That's the point: agents that produce, not just talk.